Written on 20th August, 2023 | 4 min read
How to automate content creation with Airtable, Make.com and OpenAI’s API
Create hundreds of pages with similar structure and populate them automatically
Andreea Macoveiciuc
Strategist @School of Content
Hey there, long time no see. As usually, no fluffy intro — let’s get straight to the point.
The goal of this article is to teach you two things:
How to create content for blog articles or landing pages programmatically
How to integrate Airtable with OpenAI’s ChatGPT using Make.com
Why would you want to know how to do these specific actions? Let’s start by explaining the concept of programmatic SEO (pSEO).
What is programmatic SEO?
Programmatic SEO refers to the practice of using automation and data-driven processes to optimize and improve a website’s search engine visibility and performance.
pSEO has many use cases, from keyword research and on-page optimization to rank tracking, competitive analysis, or content generation. I will only cover the last one, as it’s what we’ll focus on in this tutorial.
Automated content generation techniques such as programmatic SEO can create SEO-friendly content based on specific input parameters — keywords, target persona, topic, and so on.
It’s a useful technique when you want to publish a lot of content fast, and when your pages have similar structure.
For example, in SaaS, you might want to create a lot of pages for /integrations supported by your product, in a folder structure like /integrations/integration-name.
Each individual /integration-name page can be created using programmatic SEO.
The steps in this article will show you how to do the first part — automate the content creation itself, and I’ll write another tutorial to show how to publish this content automatically in a CMS.
How to create content programmatically, with Airtable and OpenAI / ChatGPT
First, here’s what you’ll need:
Airtable account: You’ll need the Pro subscription starting at $20/month to be able to use scripts. The other plans support automations, but not scripts, so you won’t be able to call webhooks in Make.com.
Note: Airtable charges yearly by default. Make sure to switch that to monthly before upgrading, if you’re not interested in a full year plan.
2. OpenAI API key — go to https://platform.openai.com/account/api-keys and create a new key.

Image: Open AI API key generation
3. Make.com account — Free to use here.
Step-by-step process
Set up your Airtable base, with minimum fields to you can get started. For this tutorial, I’m creating a couple of pages for 30–60–90 day plans for different marketing roles. For example, what should a Digital Marketing Manager do in their first 30, next 30, and last 30 days?
Here’s the setup I used:

Image: Airtable content calendar setup
2. Automate the fields that require manual manipulation or data cleanup for their final form. For this, I’ll use only Airtable automations — no Make.com or ChatGPT yet.
For example, I want to automatically create the:
Page title
Page slug
The Page title should always be “30–60–90 day plan for [Role]”. For this purpose. I’ll set up the column as formula, as shown below.
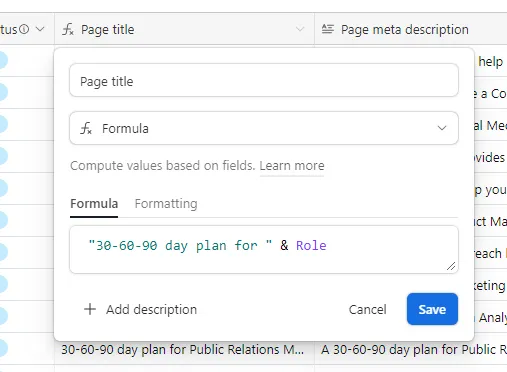
Image: 1 qITMjL5WBwpQmiy7daU8-Q
For the page slug, I want a format like “30–60–90-plan-[role]”, so I need to do two things:
Turn the job title into a lowercase string that’s concatenated and separated by hyphens. I’ll create a separate column, call it “Role sluggified”, and use the formula below:
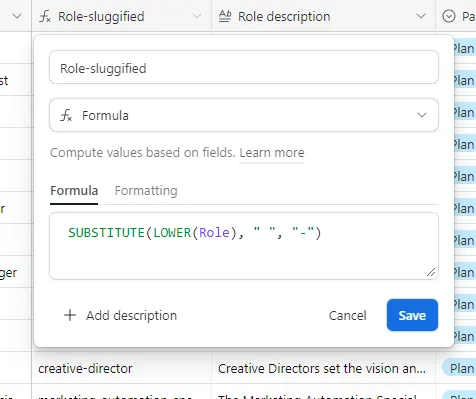
Image: 1 jkzw qOoOXCbfAcyA9383Q
Then, I’ll go to the Slug column and use the formula below:
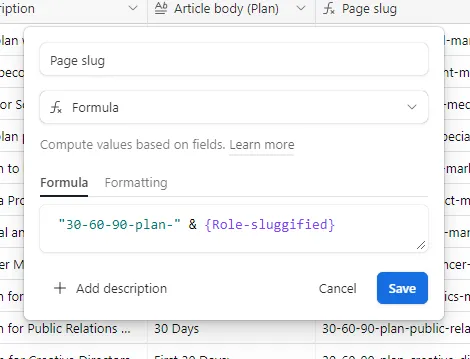
Image: 1 V6-O9SJbPmFNjd6iejL2iQ
Now we have the page titles and the slugs ready whenever a new entry is added to the table.
Let’s do the first actual automation.
3. We’ll automatically generate an outline for each of these plans, using OpenAI’s API.
What will happen is that we’ll tell Make.com that when the value of the Page status column changes from ‘blank to ‘Generate plan’, it should call the API and give it a prompt.
Based on this prompt, we’ll get back an outline in the specified format.So first, in the Page status column, add these default values to choose from: Generate plan, Plan ready, and Plan published.
Next, create an automation in Airtable that calls the Make.com webhook when the page status changes.
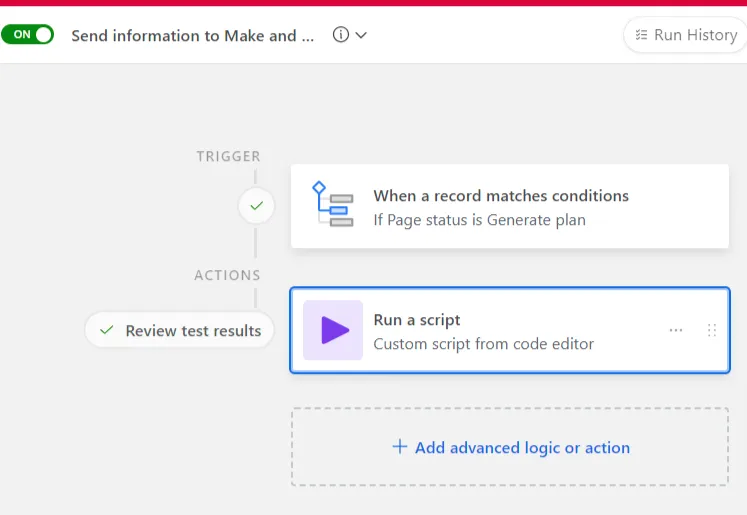
Image: 1 2ZwEsDUtBwogBPFUwD72Kg
The trigger is just a status change. The script for the action is:
const webhookUrl = "webhook-value"; // Replace webhook-value here with the URL you get from Make.com const inputData = input.config(); const {recordId} = inputData; const response = await fetch(`${webhookUrl}?recordId=${recordId}`) console.log(response.status); // Just to see what you're getting back
To get the webhook URL, create a new sequence in Make.com, and add a webhook first.
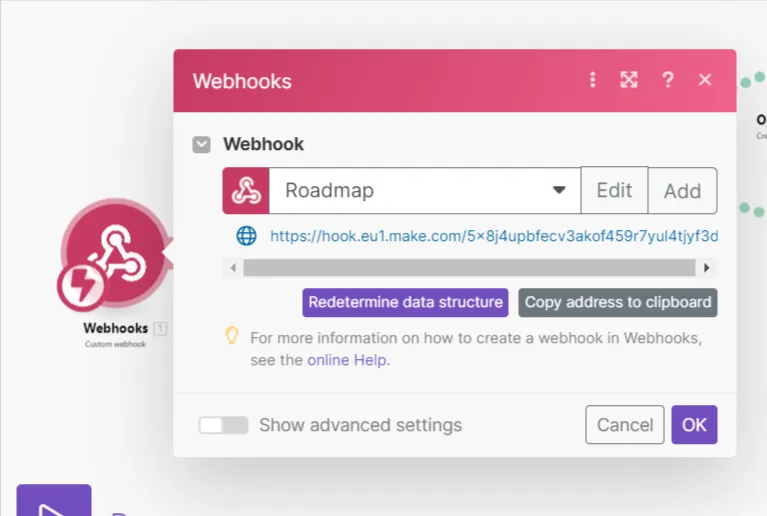
Image: 1 LEAg9jTKMPEl7qAARh9rZA
Next, click on ‘Run once’ in Make.com and go to Airtable to manually run the automation one time. You’ll see that the webhook will receive your test record’s data.
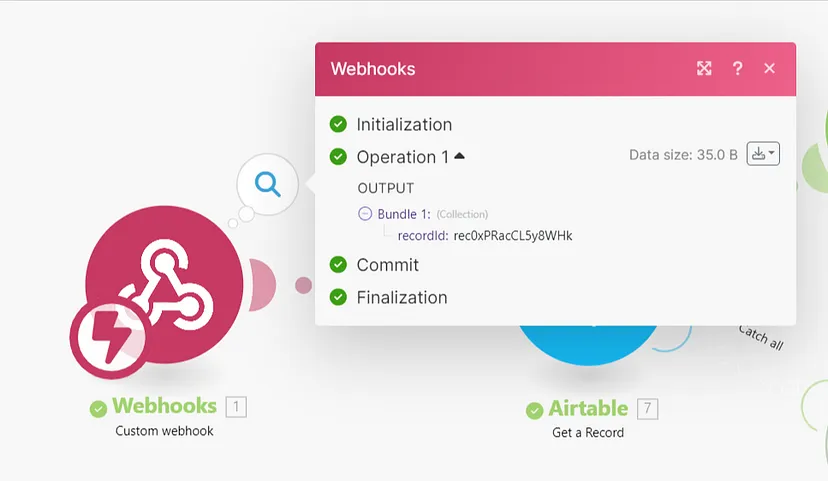
Image: 1 XrTQxdkrZHUHLZbRtR LGg
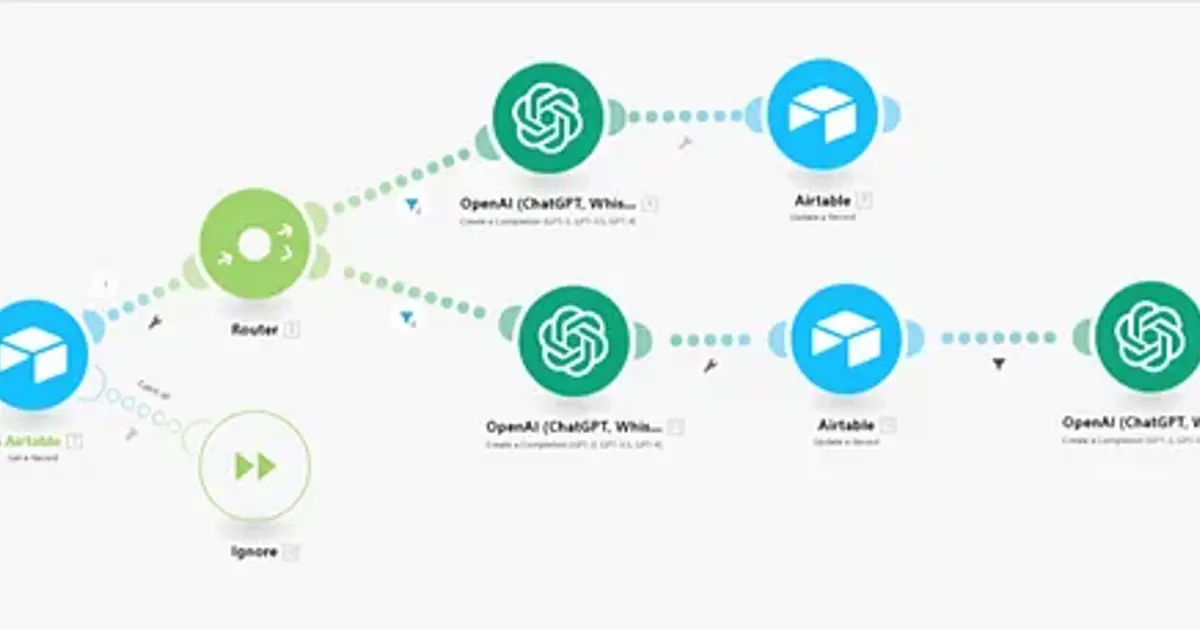
Now let’s build the rest of the flow in Make.com, before adding more automations
4. Build the flow as shown below. You’ll need to add:
Webhook
Airtable — Get a record
Router
OpenAI - Two branches, each of them to Create a completion
On branch one, add Airtable — Update a record
On branch two, add Airtable — Update a record, then another OpenAPI — Create a completion block, and last, another Airtable-Update a record block.
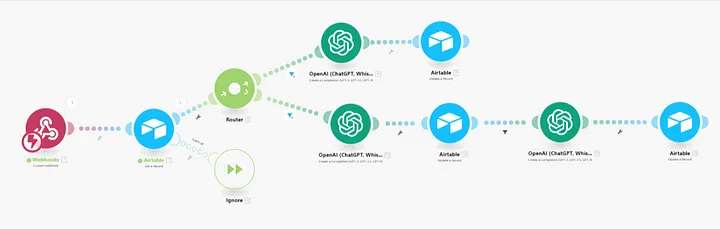
Image: Automate content creation with Open AI and Airtable
Please note that you can build these sequences however you want them, I just want to show a few things with this structure.
Now let’s use the first branch with OpenAI integration to create the outline using ChatGPT. For this, we’ll need to add a prompt like below:
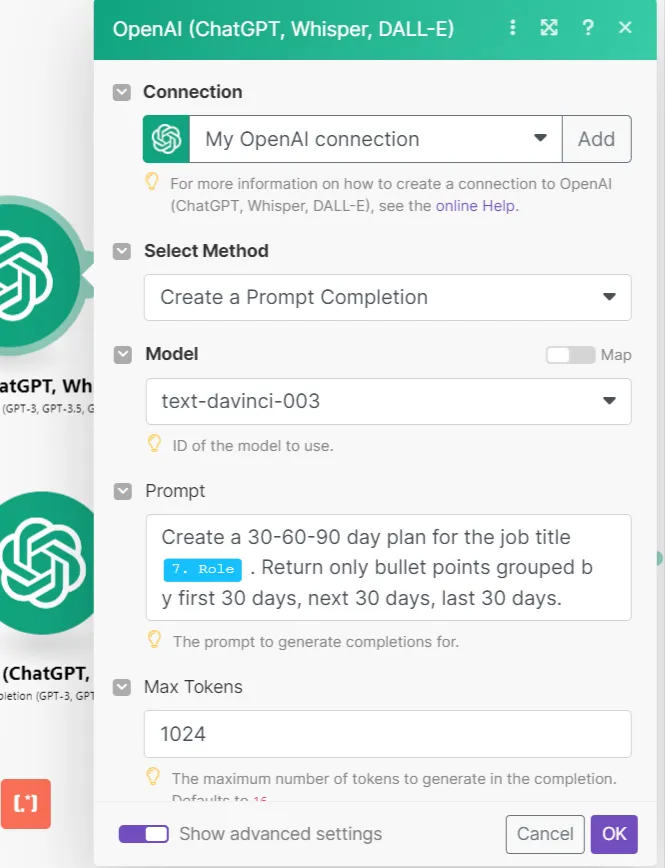
Image: 1 t 34Ci UG3emN42RkkUvFg
On the same branch, I’m using this filter, to prevent an existing plan from being rewritten.
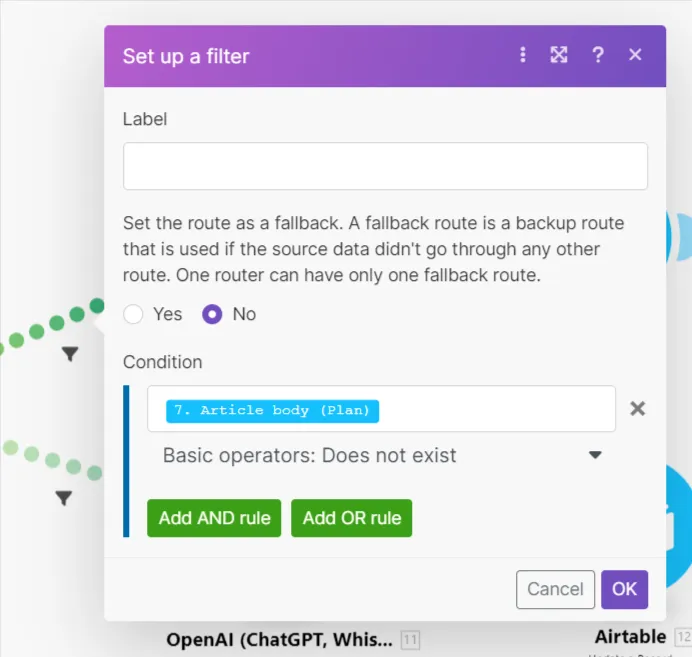
Image: 1 4CmW497pN8ioQlX6FabIrw
Finally, the last block will update the Airtable record, respectively the column Article body (Plan). The data pulled there will come from Open AI.
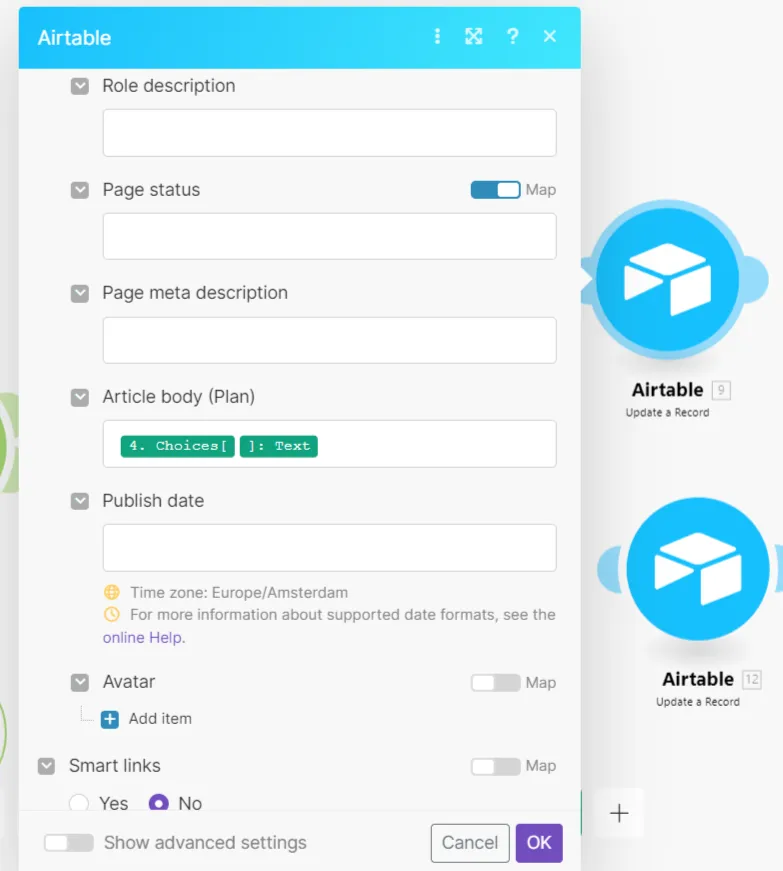
Image: 1 -F 9mT5d9-2TV8PlKyD Zg
You’re all set now. Go ahead and add a few job titles in the Airtable base, then change the status for one of them to “Generate plan”.
Follow the same logic for the second branch, to create the metadescription, and a short description of the role, to use it as intro in the actual article.
You can see the Airtable base here.
Hope you’ll find this useful! Let me know if you have questions and follow me here or on LinkedIn for more non-fluffy marketing stuff! :)